To create a hotspot service, you must define the required basic settings.
SZ supports only one grace period, session timeout, UTP, VLAN and all UE session related configuration. These configurations for the first WLAN do not work when the UE joins the second WLAN. The configuration works only when the UE roams within the cluster node. The configurations do not work when the client roams from one zone to another zone or from one cluster to another cluster.
Before creating a hotspot, you need to create a user defined interface.
-
Go to
.
-
Select the
Hotspot (WISPr) tab, and then select the zone for which you want to create the portal.
-
Click
Create.
The
Create Hotspot (WISPr) Portal page appears.
Figure 111
Creating a Hotspot (WISPr) Portal
-
Under
General Options, enter portal name and portal description.
-
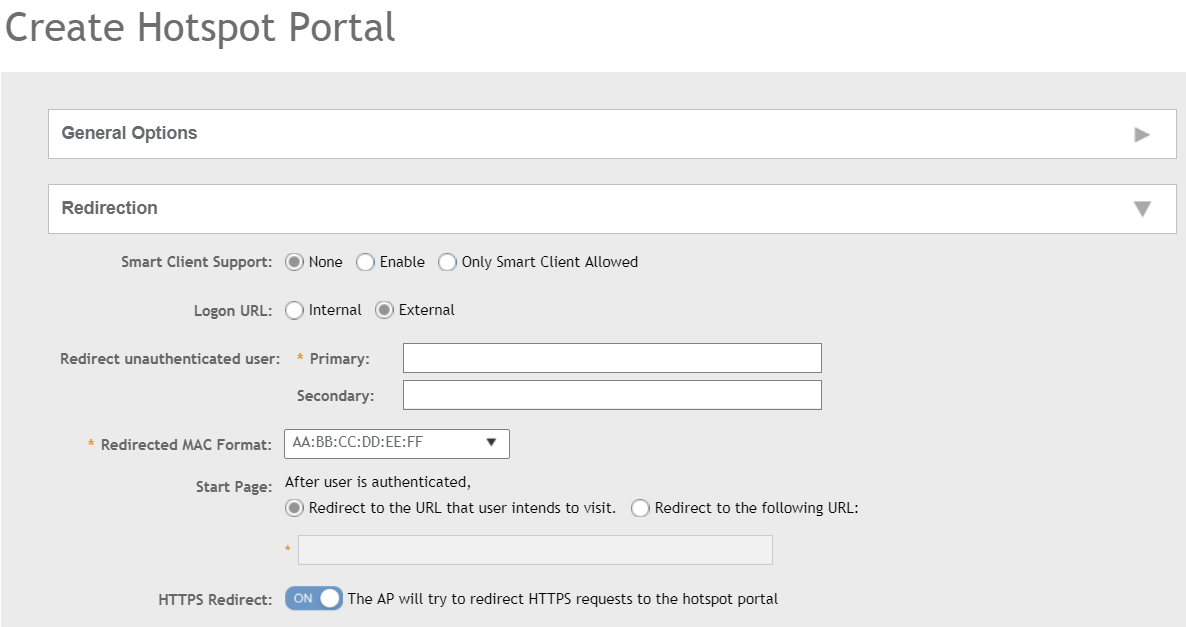
Under
Redirection, select where to redirect the user after successful authentication.
- For
Smart Client Support, select one of the following options:
- None: Disables Smart Client Support on the hotspot service.
- Enable: Enables Smart Client Support.
- Only Smart Client Allowed: Allows only Smart Clients to connect to the hotspot service.
- For
Logon URL, select one of the following options:
- Internal: Indicates the internal URL of the subscriber portal (where hotspot users can log in to the service).
- External: Indicates the external URL of the subscriber portal.
Selecting
External provides an option to reroute an unauthorized user to a primary location. You can set the primary location in
Redirect unauthenticated user. If an unauthorized user is rerouted, the AP redirects the UE to a backup portal.
The AP subscriber portal supports ZD-style API to login and logout. A customer can use AP IP address to submit the login or logout request.
- Redirect unauthenticated user: APs can perform WISPr redirection. Native WISPr support is available on SZ-managed APs even if access to SZ is not available. It supports external portal redirection with survivability when APs cannot reach the centralized SZ. It also supports backup portal redirection if primary portal is down. The WISPr authentication load can be distributed to AP or use an AP as a WISPr authentication backup.
WISPr redirection and survivability is supported only on Ruckus 11AC Wave 1 and later APs. Only ZD-style external WISPr is supported. No NBI is supported for backup.
- Primary: Redirects an unauthenticated user to a specified URL for authentication.
- Secondary: Redirects an unauthenticated user to the backup external portal if the primary URL is down. The AP periodically accesses the primary portal URL to detect and check the availability of the primary URL.
NOTE
An AP and the primary portal must be in the same VLAN for the AP to access the primary portal.
- In the
Redirected MAC Format field, enter the format of the redirection MAC address.
- For
Start Page, select one of the following options:
- Redirect to the URL that the user intends to visit: Redirects users to the page that they want to visit.
- Redirect to the following URL: Sets a different page where users will be redirected (for example, your company website).
Enter a domain name or an IP address to be redirected.
- Enable
HTTPS Redirect if you want the AP to redirect HTTPS requests to the hotspot portal. HTTPS requests are dropped if this option is disabled.
-
Under
User Session, set the session timeout and grace period.
- Session Timeout: Sets a time limit (in minutes) after which users will be disconnected from the hotspot service and required to log in again.
- Grace Period: Sets the time period (in minutes) during which disconnected users are allowed access to the hotspot service without logging in again.
-
Under
Location Information, set the location ID and location name.
- In
Location ID, enter the ISO and ITU country and area code that the AP includes in accounting and authentication requests. The code includes the following requirements:
- isocc (ISO-country-code): The ISO country code that the AP includes in RADIUS authentication and accounting requests.
- cc (country-code): The ITU country code that the AP includes in RADIUS authentication and accounting requests.
- ac (area-code): The ITU area code that the AP includes in RADIUS authentication and accounting requests.
- network: Name of the network.
The following example illustrates a proper location ID entry: isocc=us,cc=1,ac=408,network=Ruckus
- For
Location Name, enter the name of the location of the hotspot service.
-
Under
Walled Garden, click
Add to add a user to a walled garden and provide access.
-
Click
Import CSV to import the CSV file with the user information.
-
Select
Traffic Class Profile and click
+ to create a traffic class profile. Refer to
Creating a Traffic Class Profile section in the Administration guide.
-
Under
Advanced Options, select the required options:
- Click
Use Token Redirect URL and enter a signature signing key.
- Click
Enable Internal Node and enter the internal node.
NOTE
If an
Internal node is enabled, then only one IP is used and the IP domain name and IP ranges are not supported.
-
Click
OK.
You have completed creating a Hotspot (WISPr) portal.
NOTE
If
Traffic Class Profile or
Use Token Redirect URL is enabled,
Smart Client Support is set to
None.
NOTE
You can also edit, clone, and delete a Hotspot (WISPr) portal by selecting the
Configure,
Clone, and
Delete options respectively from the
Hotspot (WISPr) tab.