Creating an Ethernet Port Profile
An Ethernet port profile contains settings that define how an AP will handle VLAN packets when its port is designated as either trunk, access, or general port. By default, three Ethernet port profiles exist: General Port, Access Port and Trunk Port.
- Go to Services & Profiles > Tunnels and Ports.
- Select the Ethernet Port tab, and then select the zone for which you want to create the profile.
-
Click
Create.
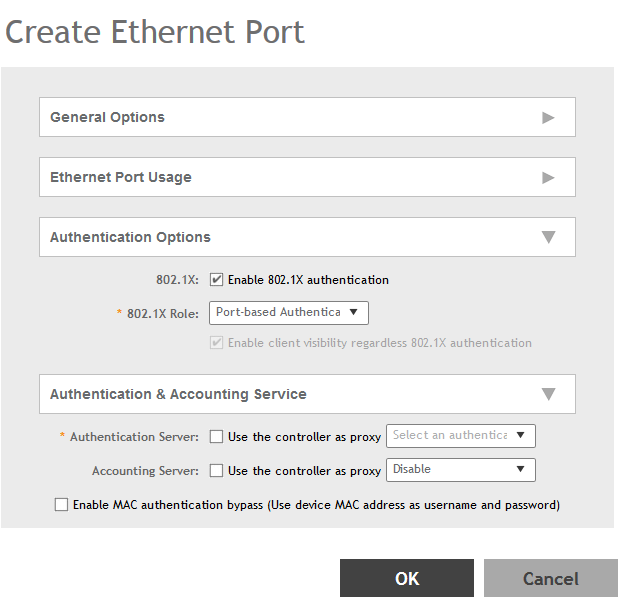
The Create Ethernet Port page appears.Figure 159 Creating a Ethernet Port Profile
-
Configure the following:
- General Options
- Name: Type a name for the Ethernet port profile that you are creating.
- Description: Type a short description about the profile.
- Type: The Ethernet port type defines how the AP will manage VLAN frames. You can set Ethernet ports on an AP to one of the following types: Trunk Port, Access Port or General Port.
By selecting the appropriate port type, authentication method, and 802.1X Role, administrator can configure the ethernet ports to be used for the wired client. Up to 16 devices can be configured to connect to one ethernet port. After configuring the ports, the wired clients and their stats are displayed in the Clients > Wired Clients page. You can also delete a wired client from this page.
- Ethernet Port Usage
- Access Network: Select this check box to enable tunneling on the Ethernet port.
- VLAN Untag ID: Type the ID of the native VLAN (typically, 1), which is the VLAN into which untagged ingress packets are placed upon arrival. If your network uses a different VLAN as the native VLAN, configure the AP Trunk port’s VLAN Untag ID with the native VLAN used throughout your network.
- VLAN Members: Type the VLAN IDs that you want to use to tag WLAN traffic that will use this profile. You can type a single VLAN ID or a VLAN ID range (or a combination of both). The valid VLAN ID range is 1 to 4094.
- Enable Dynamic VLAN: Select this check box if you want the controller to assign VLAN IDs on a per-user basis. Before enabling dynamic VLAN, you need to define on the RADIUS server the VLAN IDs that you want to assign to users.
NOTEThis option is only available when Type is set to Access Port and 802.1X authentication is set to MAC-based Authenticator.NOTEIf you enable client visibility, a maximum of 16 clients can be connected to a port regardless of the 802.1X authentication. The same limitation applies when 802.1X authentication is enabled and client visibility is not enabled.
- Guest VLAN: If you want to assign a device that fails authentication to still be able to access the Internet but to internal network resources, select this check box.
NOTEThis check box only appear when the Enable Dynamic VLAN check box is selected.
-
Anti-spoofing: Prevents attacks on genuine clients from rogue clients that could lead to service disruption, data loss and so on. This is achieved by matching the MAC address or IP address (IPv4) of the client with the address in the Ruckus database. If the addresses do not match, the packet is dropped. These checks are also performed on ingress data packets to catch spoofed data packets early.
- ARP request rate limit: type the packets to be reviewed for ARP (Address Resolution Protocol) attacks, per minute. In ARP attacks, a rouge clients send messages to a genuine client to establish connection over the network.
- DHCP request rate limit: type the packets to be reviewed for DHCP pool exhaustion, per minute. When rouge clients send a DHCP request with a spoofed address, an IP address from the DHCP pool is assigned to it. If this happens repeatedly, the IP addresses in the DHCP pool are exhausted, and genuine clients might miss out on obtaining the IP addresses.
NOTEWhen you enable anti-spoofing, an ARP request and DHCP request rate limiter is automatically enabled with default values (in ppm or packets per minute) which are applied per client; Implying that each client connected to an interface enabled with anti-spoofing is allowed to send a maximum of "X" ARP/DHCP request ppm. The value "X" is configured on the interface that the client is connected to.NOTEThe Force-DHCP option will be enabled by default when the Anti-spoofing feature is enabled, and it cannot be changed after Anti-Spoofing is enabled. - Authentication Options
- 802.1X: Select this check box to enable 802.1X authentication.
- Enable client visibility regardless of 802.1X authentication: select this check box to bypass 802.1X authentication for client visibility.
NOTEYou can view statistical information about wired clients even without enabling 802.1X authentication.
- 802.1X Role: Select the authenticator role from the drop-down menu. Options include Supplicant, MAC-based Authenticator and Port-based Authenticator. When you select Supplicant, you can customize the username and password to authenticate as a supplicant role or use the credentials of the AP MAC address. When you select Port-based Authenticator, only a single MAC host must be authenticated for all hosts to be granted access to the network. If you select MAC-based Authenticator, each MAC address host is individually authenticated. Each newly-learned MAC address triggers an EAPOL request-identify frame.
- Authentication and Accounting Services
- Authentication Server: Select the check-box and a controller from the drop-down menu to use the controller as a proxy authentication server.
- Accounting Server: Select the check-box and a controller from the drop-down menu to use the controller as a proxy accounting server.
- Enable MAC authentication bypass: Select this check-box if you want to use the device MAC address as access credentials (username and password).
- RADIUS Options
- NAS ID: Set the NAS ID for the AP to communicate with the RADIUS server. Options include using the AP MAC address or any User-defined address.
- Delimiter: If AP MAC is selected to configure the NAS ID, then you can choose between Dash or Colon as delimiters to separate.
- Click OK.
- General Options
You have created the Ethernet Port profile.
NOTE
You can also edit, clone and delete the profile by selecting the options
Configure,
Clone and
Delete respectively, from the
Ethernet Port tab.
Parent topic: Working with Tunnels and Ports