Follow these steps to generate a guest pass.
-
Click .
The Guest Pass page appears.
-
Click Generate Guest Pass.
The Generate Guest Pass form appears.
-
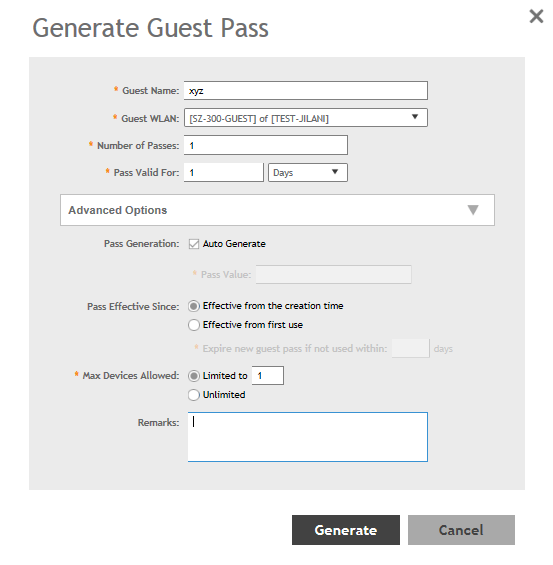
Configure the following options:
- Guest Name: Type a name that you want to assign to the
guest user.
- Guest WLAN: Select the guest WLAN that you created in
Step 2: Create a Guest Access WLAN.
- Number of Passes: Type the number of guest passes that
you want to generate.
- Pass Valid For: Set the validity period for the guest
pass by filling in the two boxes. For example, if you want the guest pass to be
valid for seven days, type 7 in the first box, and then
select Days in the second box.
-
Configure the advanced options:
-
Pass Generation: Select the Auto
Generate check box if you want the controller to generate the
guest pass key automatically.
If you want to generate the guest pass manually, clear the Auto
Generate check box.
If you are generating more than one guest pass, the Auto Generate check box
is selected automatically and is not configurable.
-
Pass Effective Since: Set the guest pass validity
period by selecting one of the following options:
- Effective from the creation time: This type of
guest pass is valid from the time it is first created to the specified
expiration time, even if it is not being used by any end user.
- Effective from first use: This type of guest pass
is valid from the time the user uses it to authenticate with the
controller until the specified expiration time. An additional parameter
(Guest Pass will expire in X days) can be configured to specify when an
unused guest pass will expire regardless of use. The default is 7
days.
- Expire guest pass if not used within [ ] days: If
you want this guest pass to expire if it is unused after you generated
it, type the number of days in the box (maximum value is 365 days).
-
Max Devices Allowed: Set the number of users that can
share this guest pass.
- Limited to [ ]: If you want a limited number of
users to share this guest pass, click this option, and then type the
number in the box.
- Unlimited: If you want an unlimited number of
users to share this guest pass, click this option.
- Session Duration: If you clicked
Unlimited, this option appears. If you want
require users to log on again after their sessions expire, select the
Require guest re-login after [ ] check box, and
then select a time increment. If this feature is disabled, connected
users will not be required to re-log in until the guest pass
expires.
-
In Remarks (optional), type your notes about this
guest pass, if any.
-
Click Generate.
The page refreshes, and then the guest pass you generated appears in a
table, along with other guest passes that exist on the controller.
Click
Enable to enable the guest pass for a user, and
Disable to revoke the guest pass for a particular
user.
You have completed generating a guest pass. You are now ready to send the guest
pass to guest users. See Step 4: Send Guest Passes to Guest Users for
information.
You can view the list of guest passes by applying filters. Click the
 icon to do
so.
icon to do
so.
The following information is displayed when you click on the guest pass
created:
Figure 87
Generating a guest pass
 icon to export all the data into a CSV file.