Viewing Port Details
Details on port use are available for individual switches, stacks, and switch groups.
Perform these steps to display information on ports for a switch, stack, or switch group.
-
Select the switch or group and click the
Ports tab.
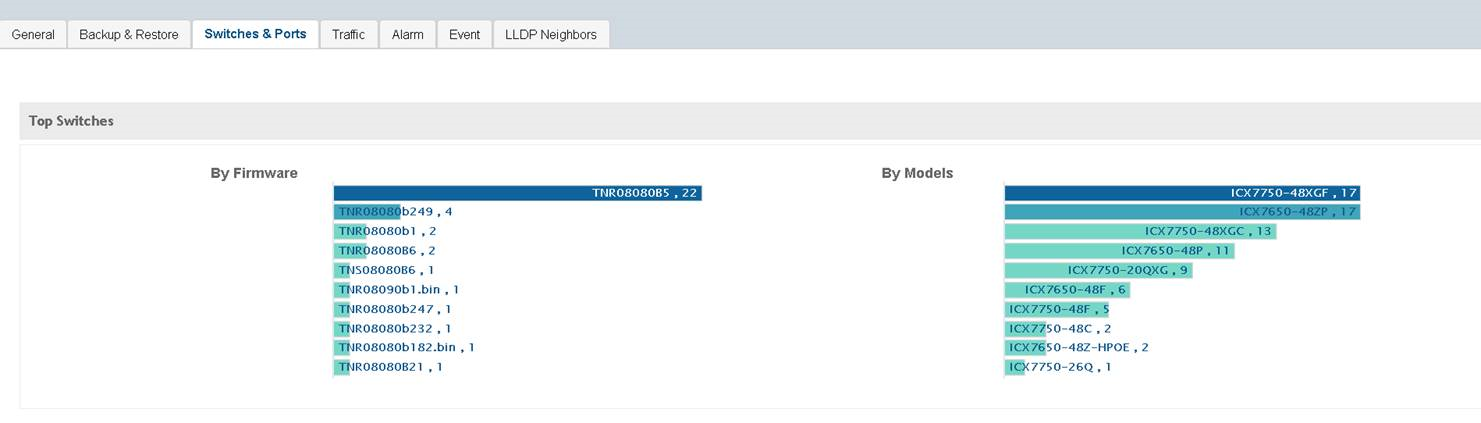
For a switch group, a Top Switches page similar to the following figure is displayed. The graphs provide information on top switches based on firmware and model.Figure 87 Top Switches Page
 For standalone switches, the Ports Summary page is displayed in the Ports tab as shown in the following figure. The Ports Summary page provides information on the ports for the selected switch or group, including the total number of ports connected to the switch or stack, the number of ports active at various speeds, operational status of the ports (Up or Down), warnings associated with ports when alarms or events are triggered, and the number of ports managed by an administrator.Figure 88 Ports Summary
-
Click the switch name to view the
Ports View page for additional port information as shown in the following figure.
The Ports View page provides information on the state of all ports in each switch module, for example port Up, Down, or Administratively Down.Figure 89 Ports View
 The following figure shows the diagram legend used in the Ports View page.Figure 90 Diagram Legend
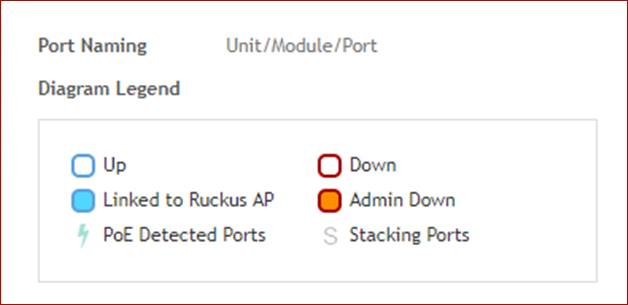 The following list further describes items in the Ports View legend.
- Up: Ports that are up or active
- Warning: Ports that have packet errors
- Down: Ports that are down or inactive
- By Admin: Ports that have been manually disabled by the network administrator
-
Click the switch name to view the
Port Details page as shown in the following figure.
Figure 91 Port Details
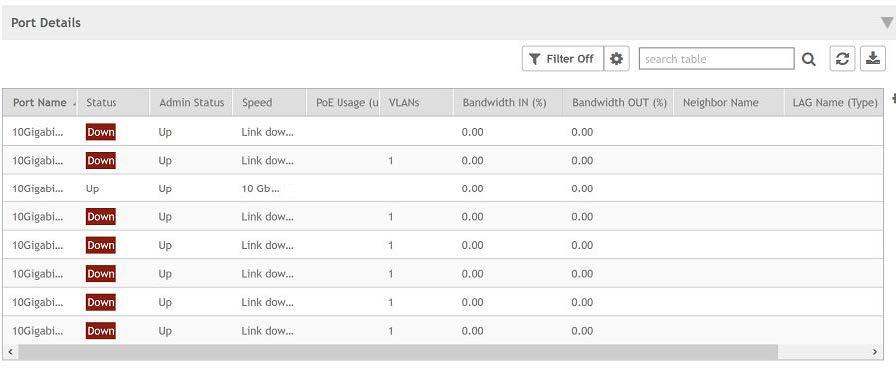
The Port Details page provides the following information on each port:NOTEPorts for switch stacks are not configurable from the Port Details page.- Port Name: The port name
- Port Number: The port number
- Status: Whether the port is operationally up or down
- Admin Status: Whether the port has been set to Up or Down by the network administrator
- Speed: The speed of the port
- PoE Device Type: Inline power device type, such as 802.3af, 802.3at, or Legacy device
- PoE Usage (used/total watts): The PoE power usage compared to the allocated power
- VLANs: The VLANs to which the port is connected
- Bandwidth IN (%): The bandwidth utilization for incoming traffic
- Bandwidth OUT (%): The bandwidth utilization of the port for outgoing traffic
- LAG Name (Type): The name of the Link Aggregation Group (LAG)
- Optics: The type of optic
- Neighbor Name: When LLDP is enabled, the name of the neighboring device, such as an AP or another switch or router
- Incoming Multicast Packets: The total number of incoming multicast data packets
- Outgoing Multicast Packets: The total number of outgoing multicast data packets
- Incoming Broadcast Packets: The total number of incoming broadcast data packets
- Outgoing Broadcast Packets: The total number of outgoing broadcast data packets
- In Errors: The number of inbound packets that contained errors preventing them from being deliverable to a higher-layer protocol
- Out Errors: The number of outbound packets that could not be transmitted because of errors
- CRC Errors: Indicates that the checksum calculated does not match between the data sender side and the received side. A CRC error usually indicates network transmission problems.
- In Discard: The number of inbound packets that were chosen to be discarded (even though no errors are detected) to prevent their being deliverable to a higher-layer protocol. One reason for discarding such a packet could be to free up buffer space.
- Switch Name: The name of the switch connected to the port
- Switch Group: The name of the switch group connected to the port
You can also filter the list of ports by the VLANs associated with them. Click to set the filters.
NOTEIn this release only forming a LAG through the controller web user interface is supported. The system does not support configuring LAG interface detail through the controller web user interface. To configure detail settings for LAG after form it, you need to configure it through ICX console directly.
to set the filters.
NOTEIn this release only forming a LAG through the controller web user interface is supported. The system does not support configuring LAG interface detail through the controller web user interface. To configure detail settings for LAG after form it, you need to configure it through ICX console directly.