Web Authentication (also known as a “captive portal”) redirects users to a login web page the first time they connect to this WLAN, and requires them to log in before granting access to use the WLAN.
-
Go to
.
-
Select the
Web Auth tab, and then select the zone for which you want to create the portal.
-
Click
Create.
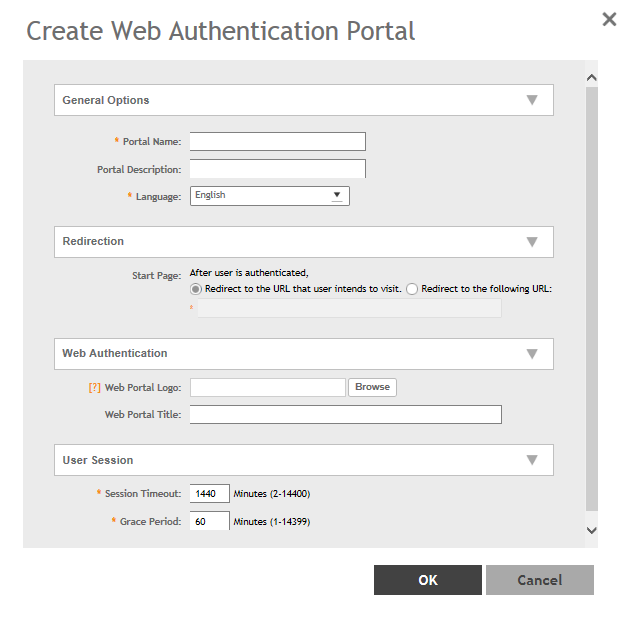
The
Create Web Authentication Portal page is displayed.
Figure 134
Creating a Web Authentication Portal
-
Configure the following options:
- General Options
- Portal Name: Type a name for the hotspot service portal that you are creating.
- Portal Description: Type a short description of the hotspot service portal.
- Language: Select the display language that you want to use on the web authentication portal.
- Redirection (Select where to redirect the user after successfully completing authentication.)
-
Web Authentication
-
Web Portal Logo: By default, the web portal page displays the Ruckus logo. To use your own logo, click the
Browse button, select your web portal logo (recommended size is 138 x 40 pixels, maximum file size is 20 KB), and then click
Open.
-
Web Portal Title: Type your own web portal title text or accept the default portal title text (Welcome to the Web Authentication login page).
- User Session
- Session Timeout: Set a time limit (in minutes) after which users will be disconnected from the hotspot service and will be required to log in again.
- Grace Period: Set the time period (in minutes) during which disconnected users are allowed access to the hotspot service without having to log in again.
-
Click
OK.
You have completed creating a Web Authentication.
NOTE
You can also edit, clone,, and delete a Web Authentication by selecting the options
Configure,
Clone, and
Delete, respectively, from the
Web Auth tab.