A guest pass template is a HTML file which contains variables for the information that guest users need to connect to the controller hotspots (for example, guest name, key, and WLAN name), and actual instructions for connecting to the guest WLAN.
A default printout template exists in the controller. If you want to create your own printout template, follow these steps.
-
Go to
.
-
Click
Guest Pass Template.
The
Guest Pass Template page appears.
-
In the
Guest Instruction HTML Template section, click
default.html, which is the default guest pass printout template.
The content of the default guest pass printout template appears in the
Name: default.html.
-
Click
Download below the template preview area to download a copy of the template to your computer.
-
Using an HTML editor, create a new HTML file.
-
Add content to the file.
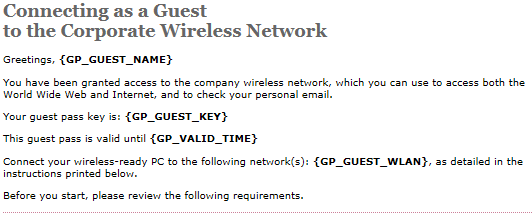
Typically, a printout template contains instructions for connecting to the controller hotspot. See the following image for the content of the default printout template.
Figure 45
Content of the default printout template
-
Insert the following variables into the content of your template:
- {GP_GUEST_NAME}: This is the guest pass user name.
- {GP_GUEST_KEY}: This is the guest pass key.
- {GP_VALID_TIME}: This is the expiration date and time of the guest pass.
- {GP_GUEST_WLAN}: This is the WLAN with which the guest user can associate using the guest name and guest key.
-
Save the file.
-
In the
Guest Instruction HTML Template page, click the
Upload button for the template that you are creating.
The
Upload a Template File form appears on the right side of the page.
-
Configure the
Upload a Template File options:
- Template Name: Type a name for the template that you are uploading.
- Template File: Click
Browse, and select the template file you created.
-
Click
Upload.
An information message box appears and informs you that the template file has been uploaded successfully.
-
Click
OK.
The template file you uploaded now appears in the list of templates.
Figure 46
The Upload a Template File form
