Creating an AP Group
Creating an AP group means creating a configuration profile that defines the channels, radio settings, Ethernet ports and other configurable fields for all members of the group or for all APs of a specific model in the group.
Follow these steps to create an AP group.
- From the left pane, select
Access Points. The below figure appears.
Figure 34 Access Point
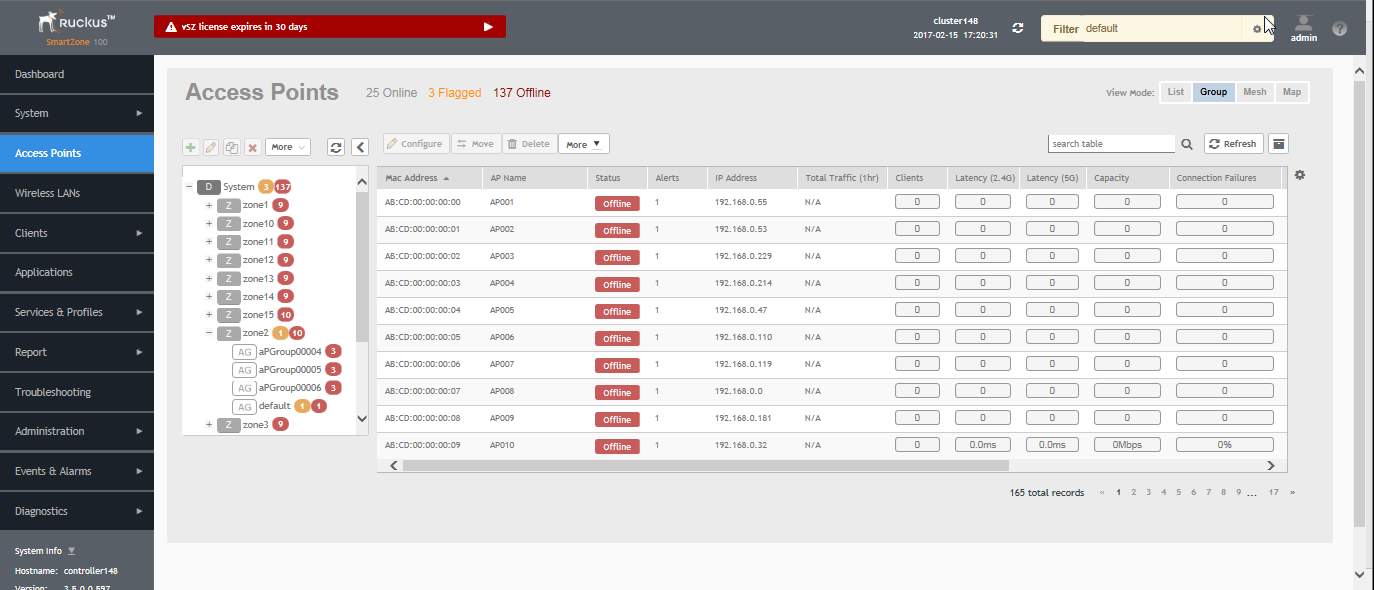
- From the System tree hierarchy, select the location (for example: System, Zone) and click
 . The following figure appears.
Figure 35 Create Groups
. The following figure appears.
Figure 35 Create Groups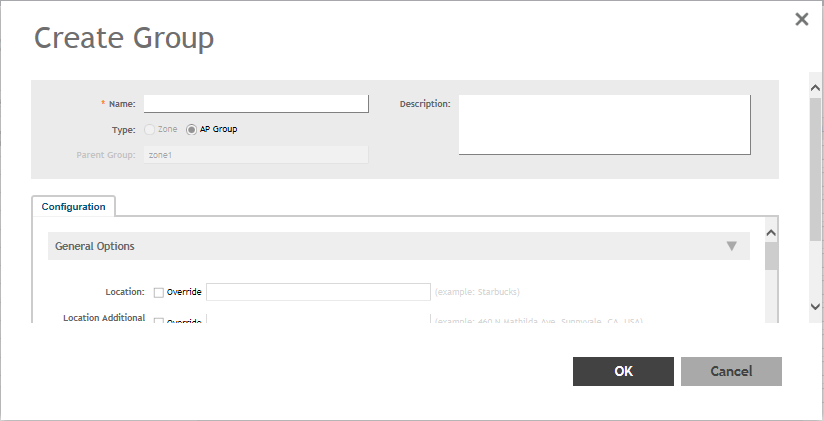
- Enter the details as explained in the following table.
NOTEYou can also edit the configuration of default APs by selecting the AP and clicking the
 icon.
icon.
- Click OK.
| Field | Description | Your Action |
|---|---|---|
| Name | Indicates a name for the Zone/AP group. | Enter a name. |
| Description | Indicates a short description. | Enter a brief description |
| Type | Indicates if you are creating a zone or an AP group. | Appears by default. You can also choose the option. |
| Parent Group | Indicates the parent group that this AP group belongs. | Appears by default. |
| Configuration > General Options | ||
| Location | Indicates generic location. | Enter the location. |
| Location Additional Information | Indicates detailed location. | Enter additional location information. |
| GPS Coordinates | Indicates the geographical location. | Enter the following coordinates in meters or floor:
|
| Configuration > Group Members | ||
| Members | Displays the list of APs that belong to the group. | Select the members from the list and click Move to to assign them to the required group. |
| Access Points | Displays the list of APs that belong to the zone. | Select the Access Points from the list and click Add to Group. |
| Configuration > Radio Options | ||
| Channel Range (2.4G) | Indicates that you want to override the 2.4GHz channel range that has been configured for the zone to which this AP group belong. | Select Select Channel Range (2.4G) check boxes for the channels on which you want the 2.4GHz radios of managed APs to operate. Channel options include channels 1 to 11. By default, all channels are selected. |
| 5.8 Ghz Channels |
Provides C-band support for all Outdoor APs and the following Indoor APs: R310, R510, R710. NOTE
This feature is available only for countries that support 5.8Ghz channel. For example, UK provides indoor AP—5.8Ghz channel support. |
Select the Allow 5.8Ghz channels check box. |
| 5.8 Ghz Channels License |
Enables full TX Power Adjustment for C-band channels.
NOTE This feature is supported only for UK.
|
Select the Allow 5.8Ghz channels use full power check box. |
| Channel Range (5G) Indoor | Indicates for what channels want the 5GHz radios of managed indoor APs to operate. | Select the check boxes. |
| Channel Range (5G) Outdoor | Indicates for what channels want the 5GHz radios of managed outdoor APs to operate. | Select the check boxes. |
| Radio Options b/g/n (2.4 GHz) | Indicates the radio option 2.4 GHz configurations. | Select the following options:
|
| Radio Options a/n/ac (5 GHz) | Indicates the radio option 5 GHz configurations. | Select the following options:
|
| Configuration > AP SNMP Options | ||
| Override zone configuration | Indicates that the AP Group configuration overrides the zone configuration. | Select the check box. |
| Enable AP SNMP | Indicates if the AP SNMP option is enabled. | Select the check box. |
| SNMPv2 Agent | Indicates SNMPv2 Agent is applied. |
|
| SNMPv3 Agent | Indicates SNMPv3 Agent is applied. |
|
| Configuration > Model Specific Options
NOTE Select the
Override check box for that setting, and then configure the setting.
|
||
| AP Model | Indicate the AP model for which you are configuring. | Select the option. |
| Status LEDs | Disable the status LED on the selected AP model. | Select the option. |
| LLDP | Enables the Link Layer Discovery Protocol (LLDP) on the selected AP model. | Select the option and enter the following details:
|
| External Antenna (2.4 GHz) | Enables the external 2.4 GHz antenna on the selected AP model. | Select the Enable external antenna check box, and then set the gain value (between 0 and 90dBi) in the box provided. |
| External Antenna (2.4 GHz) | Enables the external 5 GHz antenna on the selected AP model. | Select the Enable external antenna check box, and then set the gain value (between 0 and 90dBi) in the box provided. |
| Port Settings | Indicates the port settings. | Select the option and choose the required LAN option. |
| PoE out port | Enables PoE out mode. | Select the Enable PoE out ports (specific ZoneFlex AP models only) check box. |
| PoE Operating Mode | Indicates the PoE operating mode of the selected AP model | Choose the option.
NOTE When this option is selected, some AP features are disabled to reduce power consumption, such as the USB port and one of the Ethernet ports.
|
| Internal Heater | Enables the heater that is built into the selected AP model | Select the Enable internal heaters (specific AP models only) check box. |
| USB Port | Disables the USB port. USB ports are enabled by default. | Select the Disable USB port check box. |
| Configuration > Advanced Options | ||
| Location Based Service | Enables location-based service for the AP group. |
|
| Hotspot 2.0 Venue Profile | Indicates the hotspot profile that you want to assign to the group. | Select the required option or click
Create and update the following details:
|
| AP Management VLAN | Indicates the AP management VLAN settings. | Choose the option. Click
VLAN ID, and then type the VLAN ID that you want to assign (valid range is from 1 to 4094). To keep the same management VLAN ID that has been configured on the AP, click
Keep AP's settings.
ATTENTION For standalone APs, set the AP ethernet port to trunk before changing the AP Management VLAN settings.
|
| Auto Channel Selection | Indicates auto-channel settings. | Select the check box and choose the option. |
| Client Admission Control | Indicates the load thresholds on the AP at which it will stop accepting new clients. | Select the
Override check box respective to
2.4 GHz Radio or
5 GHz Radio and update the following details:
|
| Protection Mode | Indicates the mechanism to reduce frame collision. | Choose one of the following options:
|
NOTE
You can also edit, clone or delete an AP Group by selecting the options Configure
, Clone
 or Delete
 respectively, from the Access Points page.