Creating an IPsec Profile
- Go to Services & Profiles > Tunnels and Ports.
- Select the IPsec tab, and then select the zone for which you want to create the profile.
-
Click
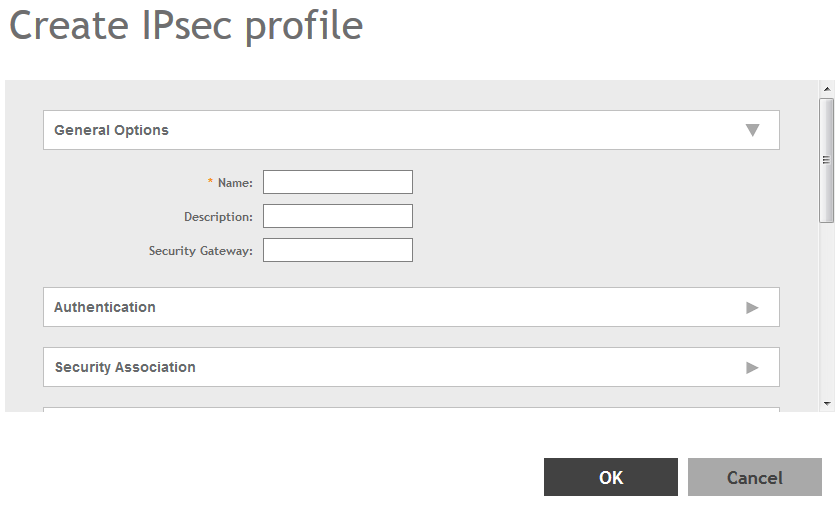
Create.
The Create IPsec Profile page appears.Figure 103 Creating an IPsec Profile
-
Configure the following:
- Name: Type a name for the profile.
- Description: Type a description for the profile.
- Security Gateway: Type the IP address or FQDN of the IPSec server. If you use the IP address, the IP address format that you must enter will depend on the IP mode that is configured on the controller.
- Authentication: Select
Preshared Key to use PSK for authentication or
Certificate to use an X.509 certificate on the certificate authority (CA) or registration authority (RA) server. The controller uses the CMPv2 protocol to obtain the signed certificate from the CA/RA server.
If you selected Preshared Key, type the PSK in this box. The PSK must be eight to 128 ASCII characters in length.
- Security Association
- IKE Proposal Type: Select
Default to use the default Internet Key Exchange (IKE) security association (SA) proposal type or select
Specific to manually configure the IKE SA proposal. If you clicked Specific, you will need to configure the following settings:
- Encryption Algorithm: Options include 3DES, AES128, AES192, and AES256.
- Integrity Algorithm: Options include MD5, SHA1, AES-XCBC, SHA256, SHA384, and SHA512.
- Pseudo-Random Function: Options include Use integrity ALG, PRF-MD5, PRF-SHA1, PRF-AES-XCBC, PRF-AES-CMAC, PRF-SHA256, and PRF-SHA384.
- DH Group: Options for Diffie-Hellman groups for IKE include modp768, modp1024, modp1536, modp2048, modp3072, modp4096, modp6144, and modp8192.
- ESP Proposal Type: Click Default to use the default Encapsulating Security Payload (ESP) SA proposal type or click Specific to manually configure the ESP proposal. If you clicked Specific, you will need to configure the following settings:
- Encryption Algorithm: Options include 3DES, AES128, AES192, AES256, and NONE.
- Integrity Algorithm: Options include MD5, SHA1, AES-XCBC, SHA256, SHA384, and SHA512.
- DH Group: Options for Diffie-Hellman groups for ESP include None, modp768, modp1024, modp1536, modp2048, modp3072, modp4096, modp6144, and modp8192.
- IKE Proposal Type: Select
Default to use the default Internet Key Exchange (IKE) security association (SA) proposal type or select
Specific to manually configure the IKE SA proposal. If you clicked Specific, you will need to configure the following settings:
- Rekey Options
- Internet Key Exchange: To set time interval at which the IKE key renews, select a time unit (day, hour, or minute) from the drop-down list, and then type a number in the box. To disable IKE rekey, select the Disable check box. SmartZone 100/Virtual SmartZone Essentials for Release 3.4 Administrator Guide 82 Configuring the Wireless Network Configuring Access Points.
- Encapsulating Security Payload: To set time interval at which the ESP key renews, select a time unit (day, hour, or minute) from the drop-down list, and then type a number in the box. To disable ESP rekey, select the Disable check box.
- Certificate Management Protocol
- DHCP Option 43 Sub Code for CA/RA Address: Set the DHCP Option 43 subcode that will be used to discover the address of the CA/RA server on the network. The default subcode is 8.
- CA/RA Address: Type the IP address or FQDN of the CA/RA server. If you use the IP address, the IP address format that you must enter will depend on the IP mode that is configured on the controller.
- Server Path: Type the path to the X.509 certificate on the CA/RA server.
- DHCP Option 43 Sub Code for Subject Name of CA/RA: Set the DHCP Option 43 subcode that will be used to discover the subject name of the CA/RA server on the network. The default subcode is 5.
- Subject Name of CA/RA: Type an ASCII string that represents the subject name of the CA/RA server.
- Advanced Options
- DHCP Option 43 Sub Code for Security Gateway: Set the DHCP Option 43 subcode that will be used to discover the address of the security gateway on the network. The default subcode is 7.
- Retry Limit: Set the number of times that the controller will attempt to discover the address of the security gateway. The default retry count is 5. Accepted values are 0 (disable) to 16.
- Replay Window: Set the ESP replay window (in packets). The default size is 32 packets. Accepted values are 0 (disable) to 32 packets.
- IP Compression: To enable IP Payload Compression Protocol (IPComp) compression before encryption, click Enable. The default value is Disable.
- Force NAT-T: To enforce UDP encapsulation of ESP packets, click Enable. The default value is Disable.
- Dead Peer Detection: By default, the IKE protocol runs a health check with remote peer to ensure that it is alive. To disable this health check, click Disable.
- NAT-T Keep Alive Interval: To set the keep alive interval (in seconds) for NAT traversal, type a value in the box. The default keep alive interval is 20 seconds. Accepted values are 1 to 65536. To disable the keep alive interval, click Disable.
- FailOver Options: To configure the failover settings when APs are unable to connect, configure the following:
- Retry Period: Set the number of days (minimum 3 days) during which APs will keep attempting to connect. To keep try indefinitely, select the Forever check box.
- Retry Interval: Set the interval (in minutes) between each retry attempt. The default retry interval is 1 minute. Accepted values are from 1 to 30 minutes.
- Retry Mode: If you want APs to fall back to the specified primary security gateway, click Revertive. If you want APs to maintain connectivity with the security gateway to which they are currently connected, click Non-revertive.
- Click OK.
You have created the IPsec GRE profile.
NOTE
You can also edit, clone and delete the profile by selecting the options
Configure,
Clone and
Delete respectively, from the
IPsec GRE tab.
Parent topic: Working with Tunnels and Ports