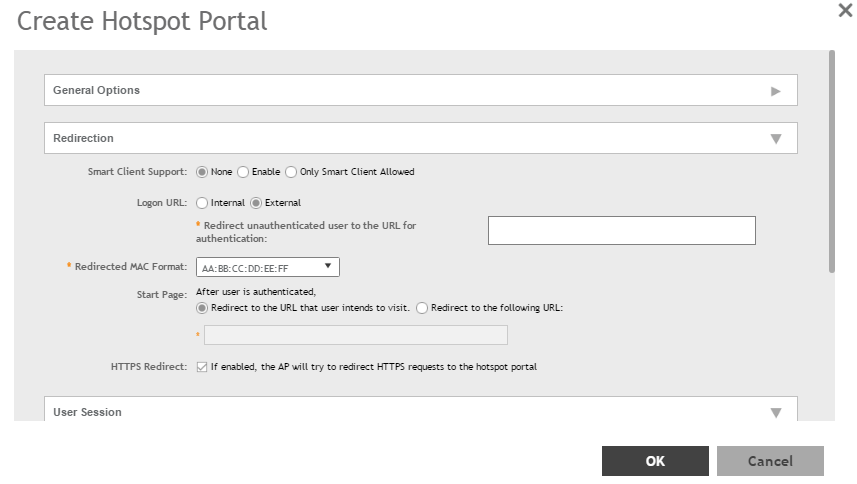
Define the basic settings that you need to configure to create a hotspot service.
SZ supports only one grace period, session timeout, UTP, VLAN and all UE session related configuration. These configurations for the first WLAN do not work when the UE joins the second WLAN. The configuration works only when the UE roams within the cluster node. The configurations do not work when the client roams from one zone to another zone or from one cluster to another cluster.
Before creating a hotspot, you need to create a user defined interface.
-
Go to
.
-
Select the
Hotspot (WISPr) tab, and then select the zone for which you want to create the portal.
-
Click
Create.
The Create Hotspot (WISPr) Portal page appears.
Figure 63
Creating a Hotspot (WISPr) Portal

-
Configure the following:
- General Options
- Portal Name: Type a name for the hotspot service portal that you are creating.
- Portal Description: Type a short description of the hotspot service portal.
- Redirection: select where to redirect the user after successfully completing authentication.
- Smart Client Support: select one of the following
- None: Select this option to disable Smart Client support on the hotspot service.
- Enable: Selection this option to enable Smart Client support.
- Only Smart Client Allowed: Select this option to allow only Smart Clients to connect to the hotspot service.
- Logon URL: select one of the following
- Internal: Type the internal URL of the subscriber portal (the page where hotspot users can log in to access the service).
- External: Type the external URL of the subscriber portal.
- Redirect MAC Format: Type the MAC address to which redirection must be done.
- Start Page: select one of the following
- Redirect to the URL that the user intends to visit: You could redirect users to the page that they want to visit.
- Redirect to the following URL: You could set a different page where users will be redirected (for example, your company website).
- HTTPS Redirect: Enable this option if you want the AP to redirect HTTPS requests to the Hotspot portal.
- User Session
- Session Timeout: Set a time limit (in minutes) after which users will be disconnected from the hotspot service and will be required to log on again.
- Grace Period: Set the time period (in minutes) during which disconnected users are allowed access to the hotspot service without having to log on again.
- Location Information
- Location ID: Type the ISO and ITU country and area code that the AP includes in accounting and authentication requests. The required code includes:
- isocc (ISO-country-code): The ISO country code that the AP includes in RADIUS authentication and accounting requests.
- cc (country-code): The ITU country code that the AP includes in RADIUS authentication and accounting requests.
- ac (area-code): The ITU area code that the AP includes in RADIUS authentication and accounting requests.
- network: The following is an example of what the Location ID entry should look like: isocc=us,cc=1,ac=408,network=RuckusWireless
- Location Name: Type the name of the location of the hotspot service.
- Walled garden: A walled garden is a limited environment to which an unauthenticated user is given access for the purpose of setting up an account.
Click
Add to add a user to walled garden, to provide access.
Click
Import CSV to import the CSV file with user information.
-
Click
OK.
You have completed creating a Hotspot (WISPr) service portal.
NOTE
You can also edit, clone and delete a Hotspot (WISPr) service portal by selecting the options
Configure,
Clone and
Delete respectively, from the
Hotspot (WISPr) tab.

