Administrators can create URL filtering policies and reuse them across WLAN controllers. You can define the policy based on the web page categorization, whitelist, blacklist and web search.
Policies can also be created based on the role assigned to the user. Users can be allowed or denied access to a particular URL based on the role assigned, and the SSID login details for that role.
Follow these steps to create a URL filtering policy:
-
Go to
.
-
Select the
Profiles tab, and then click
Create.
The
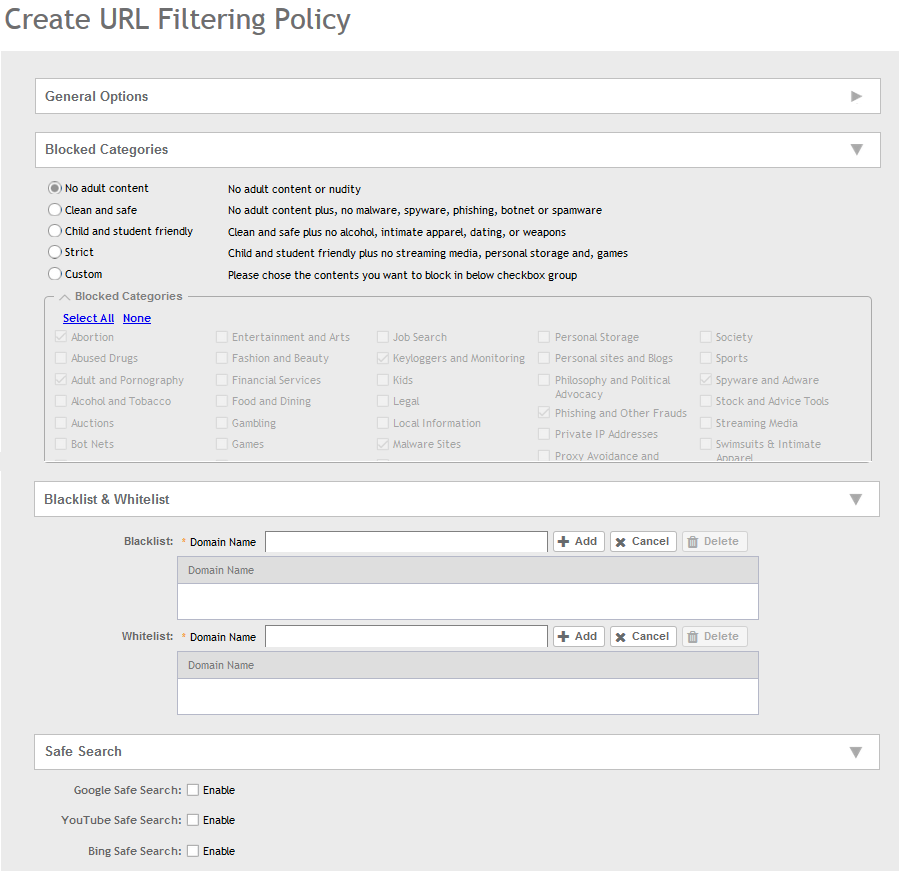
Create URL Filtering Policy page appears.
Figure 90
Creating a URL Filtering Policy

Configure the following:
- General Options
Name: type the name of the policy you want to create.
Description: type a brief description for the policy to identify
- Blocked Categories: select one of the categories to block. Choosing the Custom option allows the administrator to customize the list of categories to block for the user. You can also use Select All to choose all of the categories listed, or None to set no filters for the user to access - user can access any URL in this case as no web page is blocked.
- Blacklist and Whitelist: If web content categorization is unable to classify URLs that the user, organization or institution needs, then Whitelist or Blacklist profiles can be created by the administrator. The URLs listed by the administrator under Blacklist are blocked and those listed under Whitelist are allowed access. The domain names under the Blacklist and Whitelist take precedence over the default allow or deny action of the URL filter.
The AP matches the URL pattern against all the configured Whitelist and Blacklists through the
egrep (Extended Global Regular Expressions Print) program which performs a line-by-line scan of the file and returns lines that contain a pattern matching the given expression. Currently, the exact URL name or a wildcard at the beginning of the URL is used to match the pattern.
Administrators can also add specific IP addresses or wildcard domain names under Whitelist and Blacklist.
In
Domain Name, type the domain name of the web page that you want to deny user access to in the
Blacklist tab, and provide user access to in the
Whitelist tab. You can define up to 16 domains.
Click
Add. The domain name/web page is listed in the corresponding tab.
Click
Cancel to remove the domain name you have entered in the field.
If you want to delete the domain name from the
Blacklist or
Whitelist tab, select the URL and click
Delete.
- Safe Search: Administrators can configure the policy to include a safe search option when users access Google, YouTube or Bing to search on the internet. Select the
Enable check box to set the safe search feature to ON. Enabling this option will mandate all users using this policy on the network to use safe search on Google, YouTube and Bing. This option provides a secure connection via HTTPS while still allowing access to the internet. Enabling safe search on the browser displays the virtual IP address of the browser.
-
Click
OK.
The
URL Filtering Policy form is submitted with the specified configuration settings.
You have created the URL filtering policy. The newly created policy is displayed on
Profiles page.
If you click on the policy, it displays the following information:
-
Name
-
Managed By
-
Description
-
Filtering Level
-
# of Blocked Categorize
-
# of Blacklist
-
#of Whiltelist
-
Last Modified By
-
Last Modified On
Click
Configure to edit the policy. Click
Clone to create a duplicate of the policy, or to make modifications to the existing settings of the clone.
Click
Delete to delete the policy from the URL Filtering Profile.

