An Bridge forwarding profile defines the DHCP
configuration for the core network.
-
Go to .
-
Select the Bridge tab, and then select
the zone for which you want to create the profile.
-
Click Create.
The
Create Bridge Forwarding Profile page appears.
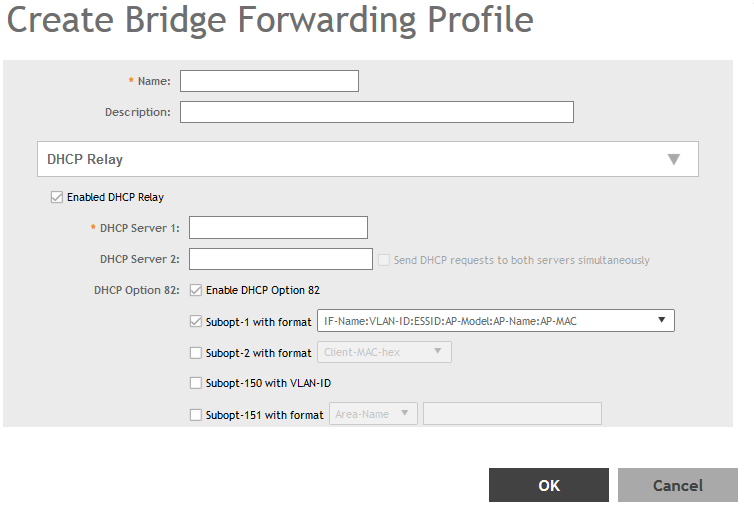
Figure 113
Creating a Bridge Forwarding Profile
-
Configure the following:
- Name: Type a name for the profile that you are creating.
- Description: Type a brief description for the profile.
- DHCP Relay: Select the Enable DHCP Relaycheck-box and
configure the DHCP server IP address and DHCP option 82 settings.
- DHCP Server 1: Type the IPv4 address of the DHCP server that will allocate IP
addresses to DHCP clients.
- DHCP Server 2: If a secondary DHCP server exists on the network, type the IPv4
address of the secondary server.
- DHCP Option 82: Select this check box if you want the DHCP relay agent (in this
case, the controller) to insert specific identification information into requests
that are forwarded to the DHCP server. If you enabled DHCP Option 82, you can
configure the following Option 82 sub-options by selecting the corresponding check
boxes:
- Subopt-1 with format: You can customize sub-option 1 (Circuit ID) to send
only the AP’s MAC address in hexadecimal format or the MAC address and ESSID.
The default format is: IFName:VLAN-ID:ESSID:AP-Model:AP-Name:AP-MAC.
- Subopt 2 with format: You can customize sub-option 2 (Remote ID), which
sends the client’s MAC address by default, to send the AP’s MAC address, or
the client MAC plus ESSID or AP MAC plus ESSID.
- Subopt-150 with VLAN ID: This sub-option encapsulates the VLAN ID.
- Subopt-151 with format: This sub-option can encapsulate either the ESSID or
a configurable Area Name.
•
- Click OK.
You have created the Bridge forwarding profile.
NOTE
You can also edit and delete the
profile by selecting the options
Configure and
Delete respectively, from the
Bridge
tab.