Creating Proxy AAA Servers
A proxy AAA server is used when APs send authentication/accounting messages to the controller and the controller forwards these messages to an external AAA server.
- Go to Services & Profiles > Authentication.
- Select the Proxy (SZ Authenticator) tab, and then select the zone for which you want to create the AAA server.
-
Click
Create.
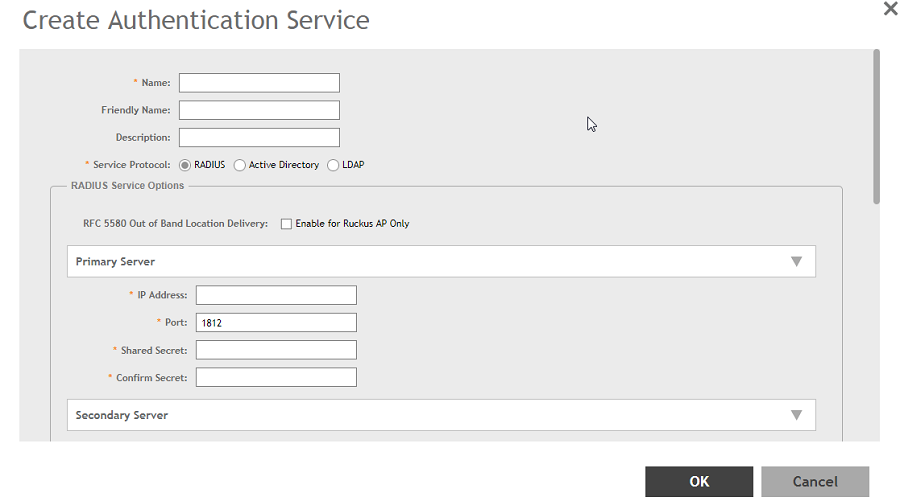
The Create Authentication Service page appears.Figure 95 Creating an Authentication Service
-
Configure the following:
- Name: Type a name for the authentication service that you are adding.
- Friendly Name: Type an alternative name that is easy to remember.
- Description: Type a description for the authentication service.
- Service Protocol: If you select
- RADIUS, see RADIUS Service Options for more information.
- Active Directory, configure the following:
- Global Catalog: Select the Enable Global Catalog support if you the Active Directory server to provide a global list of all objects.
- Primary Server:
- Encryption: Select the
Enable TLS Encryption check box if you want to use the
Transport Layer Security (TLS) protocol to secure communication with the server.
NOTEYou must also configure the Trusted CA certificates to support TLS encryption.
- Encryption: Select the
Enable TLS Encryption check box if you want to use the
Transport Layer Security (TLS) protocol to secure communication with the server.
- IP Address: Type the IPv4 address of the AD server.
- Port: Type the port number of the AD server. The default port number (389) should not be changed unless you have configured the AD server to use a different port.
- Windows Domain Name: Type the Windows domain name assigned to the AD server (for example, domain.ruckuswireless.com).
- LDAP, configure the following:
- Select the
Enable TLS Encryption check box if you want to use the
Transport Layer Security (TLS) protocol to secure communication with the server.
NOTEYou must also configure the Trusted CA certificates to support TLS encryption.
- IP Address: Type the IPv4 address of the LDAP server.
- Port: Type the port number of the LDAP server.
- Base DN: Type the base DN in LDAP format for all user accounts (for example, dc=ldap,dc=com).
- Admin DN: Type the admin DN in LDAP format (for example, cn=Admin;dc=<Your Domain>,dc=com).
- Admin Password: Type the administrator password for the LDAP server.
- Confirm Password: Retype the administrator password to confirm.
- Key Attribute: Type a key attribute to denote users (for example, default: uid)
- Search Filter: Type a search filter (for example, objectClass=Person).
- Select the
Enable TLS Encryption check box if you want to use the
Transport Layer Security (TLS) protocol to secure communication with the server.
-
HLR, configure the following:
- General Settings
- SGSN ISDN Address: Type any number from 1 to 9.
- Routing Context: Type 1 to identify the application service process (ASP).
- Local Point Code: Type the local point code number for the controller. Default is 1.
- Default Point Code format: Select Integer format.
- EAP-SIM Map Version: Select map version 3 from the drop-down menu.
- Authorization Map Version: Select map version 3 from the drop-down menu.
- SCCP Addresses Default Settings
- Source GT Indicator: Select a GT indicator from the drop-down. You can select translation type only or in addition to numbering plan, encoding scheme and nature of address indicator.
- Source Has Point Code: Select Yes or No.
- Source Translation Type: Type the appropriate integer value.
- Source Numbering Plan: Select ISDN/Recommended plan (E.163/E.164).
- Source Nature Address of Indicator: Select from Subscriber Number, Reserved for National Use, National Significant Number and International Number (recommended).
- Address Indicator: Select between Route on GT and SSN.
- Destination GT Indicator: Select a GT indicator from the drop-down. You can select translation type only or in addition to numbering plan, encoding scheme and nature of address indicator.
- Destination Translation Type: Type the appropriate integer value.
- Destination Numbering Plan: Select ISDN/Recommended plan (E.163/E.164) or E.214.
- Destination Nature Address of Indicator: Select from Subscriber Number, Reserved for National Use, National Significant Number and International Number.
- GT Point Code: Set to 2.
- SCTP Association to Core Network
- Destination IP: Type the IP address of the destination port.
- Destination Port: Type the number of the destination port.
- Source Port: Type the number of the source port.
- Max Inbound Streams: Set to 32.
- Max Outbound Streams: Set to 32
- Adjacent Point Code: Set to 2.
- SCCP GTT Table
- GT Digits: Type any number (1 to 15 digit number).
- Address Indicator: Select between options to route on GT or SSN.
- Point Code: Set to 1.
- Translation Type: Type the appropriate integer value.
- GT Indicator: Select a GT indicator from the drop-down. You can select translation type only or in addition to numbering plan, encoding scheme and nature of address indicator.
- Has Point Code: Select between Yes and No.
- Has SSN: Select between Yes and No.
- Number Planning: Select ISDN/Recommended plan (E.163/E.164) or E.214.
- Nature of Address Indicator: Select from Subscriber Number, Reserved for National Use, National Significant Number and International Number.
NOTEEnsure that the settings provided in the GTT table are match the ones provided in the SCCP Addresses Default Settings section.
- Cache Options: select Enable AV Caching (makes use of the existing cache memory values).
- General Settings
- Advanced Options - Domain name: Type the whitelisted domain name that you want to add.
- User Traffic Profile Mapping:
- Type a Group Attribute Value.
- Select a User Role from the drop-down list.
- Click Add.
- Click OK.
You have completed creating a Proxy AAA server.
NOTE
You can also edit, clone and delete an AAA server by selecting the options
Configure,
Clone and
Delete respectively, from the
Proxy (SZ Authenticator) tab.
Parent topic: Authentication