Configuring external Web Authentication
The Captive Portal profile must be created to attach it to the Web Authentication-enabled VLAN. For more information, refer to Creating captive portal profile for external web authentication.
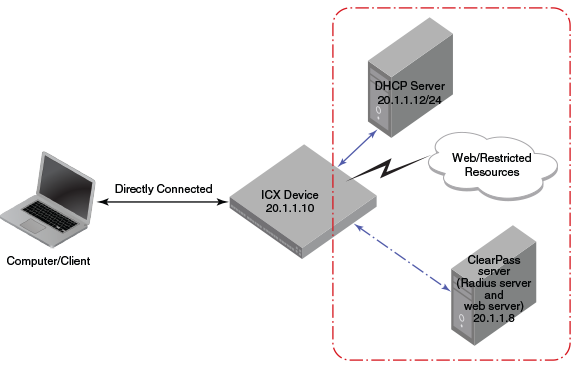
Complete the following steps to configure external Web Authentication on a device.
-
Set up any global configuration required for the ICX device, RADIUS server, Aruba ClearPass server, and other servers.
- On a Layer 2 switch, make sure the FastIron switch has an IP address configured.
device# configure terminal
device(config)# ip address 20.1.1.10/24
- On a Layer 3 switch, assign an IP address to a virtual interface (VE) for each VLAN on which external Web Authentication will be enabled.
device#configure terminal
device(config)# vlan 20
device(config-vlan-20)# router-interface ve20
device(config-vlan-20)# untagged ethernet 1/1/1 to 1/1/20
device(config-vlan-20)# interface ve20
device(config-vif-20)# ip address 20.1.1.10/24
- On a Layer 2 switch, make sure the FastIron switch has an IP address configured.
-
Configure the RADIUS server to authenticate the host username and passwords.
The Aruba ClearPass server has both a RADIUS server and a web server. Use the following commands to make RADIUS configuration on ICX switch.
device(config)# radius-server host 20.1.1.8
device(config)# radius-server key $GSig@U\
NOTEThe RADIUS key configured should be the same as the key configured in the external web server. -
Configure Web Authentication to use secure (HTTPS) or non-secure (HTTP) login and logout pages. By default, HTTPS is used.
NOTEThe protocol configured in the Captive Portal profile must be the same as the protocol configured as part of web management access.
To enable the non-secure web server on the switch, enter the following commands.
device(config)# web-management HTTP
device(config)# vlan 20
device(config-vlan-20)# webauth
device(config-vlan-20-webauth)# no secure-login
To enable the secure web server on the switch, enter the following commands.
device(config)# web-management HTTPS
device(config)# vlan 20
device(config-vlan-20)# webauth
device(config-vlan-20-webauth)# secure-login
-
Configure the key to access a secure web page using a certificate by performing one of the following steps:
If the secure Web server is used, in order to access a secure web page, the web server needs to provide a key. This key is exchanged using a certificate. A certificate is a digital document that is issued by a trusted source that can validate the authenticity of the certificate and the web server that is presenting it. Therefore the switch must have a certificate for Web Authentication to work.
- Upload a certificate using the following global configuration command.
device(config)# ip ssl private-key-file tftp ip-addr key-filename - Generate a certificate using the following global configuration command.
device(config)# crypto-ssl certificate generate
- Upload a certificate using the following global configuration command.
-
Create a Web Authentication VLAN and enable Web Authentication on that VLAN.
device(config)# vlan 20
device(config-vlan-20)# webauth
device(config-vlan-20-webauth)# enable
From this step onwards, the hosts must be authenticated to forward traffic.
-
Attach the configured Captive Portal profile to the Web Authentication-enabled VLAN.
device(config-vlan-20-webauth)# captive-portal profile cp_brocade -
Configure the Web Authentication mode as Captive Portal mode to authenticate the users in a VLAN through external Web Authentication.
device(config-vlan-20-webauth)# auth-mode captive-portal
- Configure the external Captive Portal on the Aruba ClearPass server to create a guest or web login page for external Web Authentication.